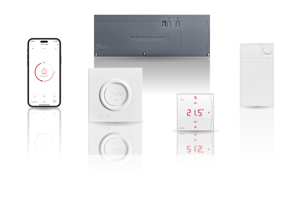
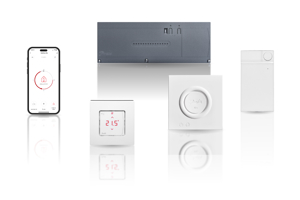
Danfoss Icon2™ hydronic floor heating
Precise and efficient control of underfloor heating with smart-home compatibility and the flexibility to fit every application.

Danfoss Icon2™ Main Controller is used for floor heating and cooling systems for individual room control. It can be configured as a wired or wireless system or as a combination, if required.
The center of the system is the Danfoss Icon2™ Main Controller, which configures and ties the system together.
Installation and set-up of the Danfoss Icon2™ Main Controller is made easy by using the pre-defined application and intuitive commissioning App.
Designed for easy selection, innovative cabling, plug‘n‘push terminals and in-app guidance ensures fast and hassle-free installation with outstanding performance.
Available in basic and advanced variants.
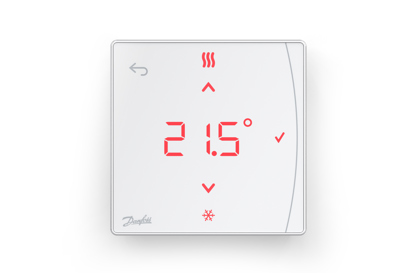
Danfoss Icon2™ RT is a series of wireless thermostats in a new and updated slim design, with tool-free magnet mounting which offers the freedom to place your thermostat without the constraints of wires in the wall. The fade away feature, together with the minimalistic design, only 16 mm deep, gives it elegance and makes it blend in with the surroundings.
The Icon2™ RT is Zigbee 3.0 certified, making it compatible with smart home solutions.
The wireless range consist of three variants:
Danfoss Icon2™ Sensor
Danfoss Icon2™ Room Thermostat
Danfoss Icon2™ Featured Room Thermostat
Danfoss Icon2™ / 24V RT 24V thermostat offers a
minimalistic design that makes them fade away
and blend into surroundings when the display is
not active. The Icon2™ / 24V RT thermostat is compatible with both Icon™ 24V Master Controller and Icon2™ Main Controller. Please be aware that FW update function is only available in combination with Icon2™ Main controller.
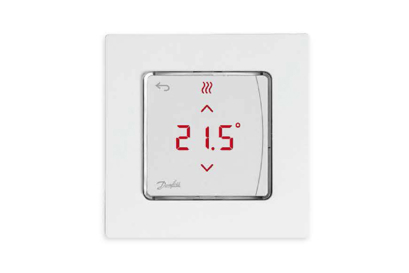
The wired range consist of the following variants:
Danfoss Icon2™ / 24V RT Room Thermostat, 24 V Display In-wall, 80x80
Danfoss Icon2™ / 24V RT Room Thermostat, 24 V Display In-wall, 86x86
Danfoss Icon2™ / 24V RT Room Thermostat, 24 V Display In-wall, CH, 88x88
Danfoss Icon2™ / 24V RT Room Thermostat, 24 V Display On-wall, 86x86
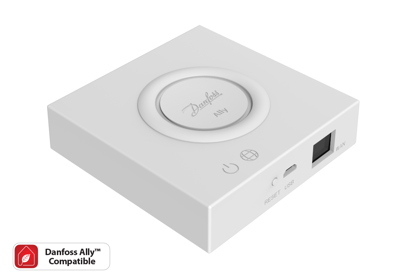
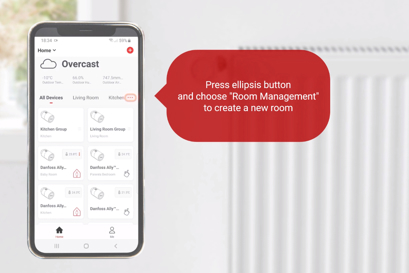
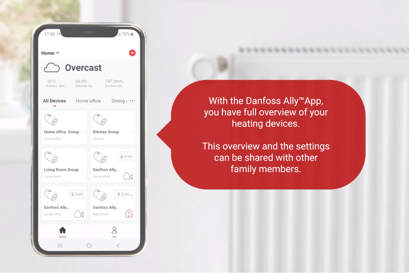
Danfoss AllyTM Gateway is a programmable, wireless control system. It is the only extra device you need to get Danfoss Icon2TM connected to the cloud, gain all the smart heating fatures and intelligent controls via the Danfoss AllyTM App.
The power supply and LAN cable for internet connection are included.
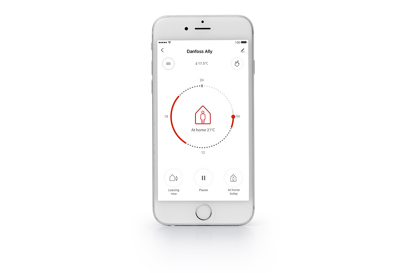
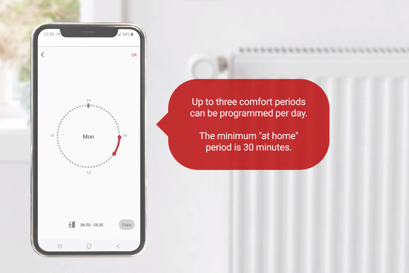
All you need to control, schedule, and monitor your hydronic floor heating and radiator heating– from anywhere and at any time. Danfoss AllyTM App guides you through the quick setup and gives you the complete overview and control.
Download the app for free from Google Play or App Store

Danfoss Icon2TM is Zigbee 3.0 certified and speaks the same wireless language as tons of other smart home devices around the globe. It is now very easy to make your smart home even smarter.
|
Danfoss Icon2™ Wireless |
Danfoss Icon2™ Wired |
|
 |
 |
|
| Thermostat models | Display + Infrared floor sensor + Sensor | Display + (Floor sensor optional) |
| Thermostat versions | On-wall | On-wall + In-wall |
| Exchangeable frame | In-wall | |
| Danfoss Ally™ compatible (app control) |
||
| Cooling options | Automatic + Manual | Automatic + Manual |
| Automatic balancing | ||
| Flow temp. control | ||
| Commissioning test | ||
| Communication | Zigbee 3.0 | Star / daisy chain bus |
| Outputs | Up to 1x15 | Up to 1x 15 |
Installation
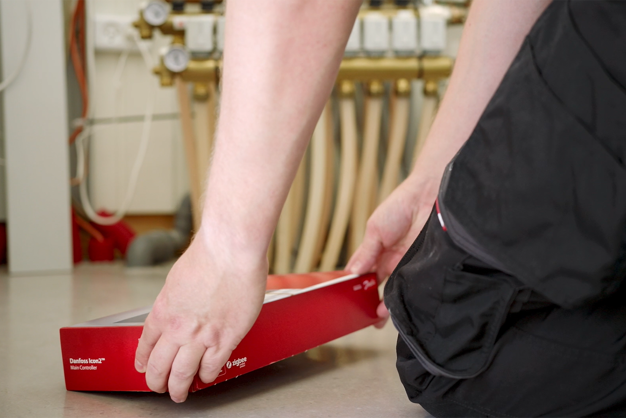
It is super easy to get complete control of the underfloor heating! The installation is quick and easy for a professional installer. The video here guides you how to.

This video guides you on how to reset the Icon2™ system.
Software
Download Danfoss Icon2™ software
Connected to a non-Danfoss hub/gateway
This firmware is designed for Zigbee Integration Partners who have incorporated the Danfoss Icon2™ Main Controller into their ZigBee gateway solutions, which are not manufactured by Danfoss.
Connected to Danfoss Ally™ Gateway
Danfoss Icon2™ Main Controller will automatically be updated to the latest software. Software updates are delivered automatically via the Ally™ Gateway and Ally™ Cloud. The Ally™ App will notify you when a new software update is available.

Documents
| Type | Name | Language | Valid for | Updated | Download | File type |
|---|---|---|---|---|---|---|
| Fact sheet | Danfoss Icon2™ - Software versions overview | English | Multiple | 25 Nov, 2025 | 223.0 KB | |
| Application guide | Danfoss Icon2™ (Application guide) | German | Multiple | 11 Aug, 2023 | 18.4 MB | |
| Application guide | Danfoss Icon2™ (Application guide) | Spanish, Castilian | Spain | 04 Feb, 2025 | 18.4 MB | |
| Application guide | Danfoss Icon2™ (Application guide) | Swedish | Sweden | 12 Sep, 2023 | 15.4 MB | |
| Application guide | Danfoss Icon2™ (Application guide) | Lithuanian | Lithuania | 21 Aug, 2023 | 18.3 MB | |
| Application guide | Danfoss Icon2™ (Application guide) | Hungarian | Hungary | 24 Apr, 2025 | 18.3 MB | |
| Application guide | Danfoss Icon2™ (Application guide) | English | Multiple | 16 Dec, 2025 | 18.5 MB | |
| Application guide | Danfoss Icon2™ (Application guide) | Latvian | Latvia | 25 Jan, 2024 | 18.3 MB | |
| Application guide | Danfoss Icon2™ (Application guide) | Danish | Denmark | 11 Sep, 2023 | 15.4 MB | |
| Application guide | Danfoss Icon2™ (Application guide) | French | Multiple | 21 Aug, 2023 | 18.3 MB | |
| Application guide | Danfoss Icon2™ (Application guide) | Ukrainian | Ukraine | 16 Aug, 2023 | 18.3 MB | |
| Application guide | Danfoss Icon2™ (Application guide) | Czech | Czech Republic | 08 Aug, 2023 | 15.4 MB | |
| Application guide | Danfoss Icon2™ (Application guide) | Estonian | Estonia | 25 Jan, 2024 | 18.3 MB | |
| Application guide | Danfoss Icon2™ (Application guide) | Chinese | China | 30 Jun, 2023 | 21.3 MB | |
| Application guide | Danfoss Icon2™ (Application guide) | Norwegian Bokmål | Norway | 26 Sep, 2023 | 18.3 MB | |
| Application guide | Danfoss Icon2™ (Application guide) | Slovak | Slovakia | 12 Sep, 2023 | 15.4 MB | |
| Application guide | Danfoss Icon2™ (Application guide) | Romanian, Moldavian, Moldovan | Romania | 05 Jul, 2023 | 20.8 MB | |
| Installation guide | Danfoss Icon2™ / 24V RT Room Thermostat (Installation Guide) | Danish; German; English; Finnish; French; Icelandic; Italian; Lithuanian; Norwegian Bokmål; Dutch, Flemish; Polish; Russian; Swedish; Turkish; Ukrainian; Chinese | Multiple | 01 Oct, 2024 | 10.1 MB | |
| Installation guide | Danfoss Icon2™ / 24V RT Room Thermostat (Installation Guide) | Danish; German; English; Finnish; French; Icelandic; Italian; Lithuanian; Norwegian Bokmål; Dutch, Flemish; Polish; Russian; Swedish; Turkish; Ukrainian; Chinese | Multiple | 17 Jan, 2025 | 9.4 MB | |
| User guide | Danfoss Icon2™ / 24V RT Room Thermostat (User Guide) | Danish; German; English; Finnish; French; Icelandic; Italian; Lithuanian; Norwegian Bokmål; Dutch, Flemish; Polish; Russian; Swedish; Turkish; Chinese | Multiple | 08 Oct, 2024 | 10.1 MB | |
| Application guide | Danfoss Icon2™ Small application guide for installers | Polish | Poland | 12 Feb, 2026 | 13.7 MB | |
| Installation guide | Danfoss Icon™ Dial 230V Room Thermostat F80 IW | English | Multiple | 29 May, 2019 | 501.7 KB | |
| Installation guide | Danfoss Icon™ Dial 230V Room Thermostat F86 OW | Arabic; Bulgarian; Czech; Danish; German; Greek (modern); English; Spanish, Castilian; Estonian; Persian; Finnish; French; Irish; Hebrew (modern); Hindi; Croatian; Hungarian; Indonesian; Icelandic; Italian; Japanese; Kazakh; Korean; Lithuanian; Latvian; Macedonian; Norwegian Bokmål; Dutch, Flemish; Polish; Portuguese; Romanian, Moldavian, Moldovan; Russian; Slovak; Slovenian; Serbian; Swedish; Tamil; Thai; Turkish; Ukrainian; Vietnamese; Chinese | Multiple | 29 May, 2019 | 809.0 KB | |
| User guide | Danfoss Icon™ Display - Room Thermostat, 230 V | Dutch, Flemish | Multiple | 16 Nov, 2016 | 1.7 MB | |
| User guide | Danfoss Icon™ Display - Room Thermostat, 230 V | Russian | Multiple | 09 Oct, 2016 | 1.8 MB | |
| User guide | Danfoss Icon™ Display - Room Thermostat, 230 V | Turkish | Multiple | 17 Oct, 2016 | 1.7 MB | |
| User guide | Danfoss Icon™ Display - Room Thermostat, 230 V | French | Belgium | 29 May, 2019 | 1.7 MB | |
| User guide | Danfoss Icon™ Display - Room Thermostat, 230 V | Swedish | Multiple | 16 Nov, 2016 | 1.7 MB | |
| User guide | Danfoss Icon™ Display - Room Thermostat, 230 V | Polish | Multiple | 09 Oct, 2016 | 1.7 MB | |
| User guide | Danfoss Icon™ Display - Room Thermostat, 230 V | Ukrainian | Multiple | 17 Oct, 2016 | 1.7 MB | |
| User guide | Danfoss Icon™ Display - Room Thermostat, 230 V | Chinese | Multiple | 09 Oct, 2016 | 1.7 MB | |
| User guide | Danfoss Icon™ Display - Room Thermostat, 230 V | Italian | Multiple | 09 Oct, 2016 | 1.7 MB | |
| User guide | Danfoss Icon™ Display - Room Thermostat, 230 V | Danish | Multiple | 09 Oct, 2016 | 1.7 MB | |
| User guide | Danfoss Icon™ Display - Room Thermostat, 230 V | Dutch, Flemish | Belgium | 29 May, 2019 | 1.7 MB | |
| User guide | Danfoss Icon™ Display - Room Thermostat, 230 V | Norwegian Bokmål | Multiple | 16 Nov, 2016 | 1.7 MB | |
| User guide | Danfoss Icon™ Display - Room Thermostat, 230 V | Finnish | Multiple | 05 Dec, 2016 | 1.7 MB | |
| User guide | Danfoss Icon™ Display - Room Thermostat, 230 V | English | Multiple | 29 Sep, 2016 | 1.7 MB | |
| User guide | Danfoss Icon™ Display - Room Thermostat, 230 V | German | Multiple | 01 Oct, 2019 | 1.7 MB | |
| User guide | Danfoss Icon™ Display - Room Thermostat, 230 V | French | Multiple | 09 Oct, 2016 | 1.7 MB | |
| User guide | Danfoss Icon™ Display - Room Thermostat, 230 V | Lithuanian | Multiple | 09 Oct, 2016 | 1.7 MB | |
| User guide | Danfoss Icon™ Display 230V Room Thermostat | Arabic; Bulgarian; Czech; Danish; German; English; Spanish, Castilian; Estonian; Persian; Finnish; French; Croatian; Hungarian; Icelandic; Italian; Korean; Lithuanian; Latvian; Norwegian Bokmål; Dutch, Flemish; Polish; Romanian, Moldavian, Moldovan; Russian; Slovak; Slovenian; Serbian; Swedish; Turkish; Ukrainian; Chinese | Multiple | 29 May, 2019 | 973.2 KB | |
| Installation guide | Danfoss Icon™ Display 230V Room Thermostat F80 IW | Arabic; Bulgarian; Czech; Danish; German; English; Spanish, Castilian; Estonian; Persian; Finnish; French; Croatian; Hungarian; Icelandic; Italian; Korean; Lithuanian; Latvian; Norwegian Bokmål; Dutch, Flemish; Polish; Romanian, Moldavian, Moldovan; Russian; Slovak; Slovenian; Serbian; Swedish; Turkish; Ukrainian; Chinese | Multiple | 29 May, 2019 | 1.5 MB | |
| Installation guide | Danfoss Icon™ Display 230V Room Thermostat F86 OW | Arabic; Bulgarian; Czech; Danish; German; English; Spanish, Castilian; Estonian; Persian; Finnish; French; Croatian; Hungarian; Icelandic; Italian; Korean; Lithuanian; Latvian; Norwegian Bokmål; Dutch, Flemish; Polish; Romanian, Moldavian, Moldovan; Russian; Slovak; Slovenian; Serbian; Swedish; Turkish; Ukrainian; Chinese | Multiple | 29 May, 2019 | 10.7 MB | |
| Installation guide | Danfoss Icon™ Display 24V Room Thermostat (Installation Guide) | Czech | Multiple | 25 Jun, 2019 | 1.6 MB | |
| Installation guide | Danfoss Icon™ Display 24V Room Thermostat (Installation Guide) | Estonian | Multiple | 25 Jun, 2019 | 1.6 MB | |
| Installation guide | Danfoss Icon™ Display 24V Room Thermostat (Installation Guide) | Romanian, Moldavian, Moldovan | Multiple | 25 Jun, 2019 | 1.6 MB | |
| Installation guide | Danfoss Icon™ Display 24V Room Thermostat (Installation Guide) | Bulgarian | Multiple | 25 Jun, 2019 | 1.6 MB | |
| Installation guide | Danfoss Icon™ Display 24V Room Thermostat (Installation Guide) | Slovak | Multiple | 25 Jun, 2019 | 1.6 MB | |
| Installation guide | Danfoss Icon™ Display 24V Room Thermostat (Installation Guide) | Hungarian | Multiple | 25 Jun, 2019 | 1.6 MB | |
| Installation guide | Danfoss Icon™ Display 24V Room Thermostat (Installation Guide) | Croatian | Multiple | 25 Jun, 2019 | 1.6 MB | |
| Installation guide | Danfoss Icon™ Display 24V Room Thermostat F80 IW (Installation Guide) | Latvian | Multiple | 13 May, 2019 | 1.6 MB | |
| Installation guide | Danfoss Icon™ Display 24V Room Thermostat F86 OW (Installation Guide) | Croatian | Multiple | 25 Jun, 2019 | 2.0 MB | |
| Installation guide | Danfoss Icon™ Display 24V Room Thermostat F86 OW (Installation Guide) | Slovak | Multiple | 25 Jun, 2019 | 2.0 MB | |
| Installation guide | Danfoss Icon™ Display 24V Room Thermostat F86 OW (Installation Guide) | Estonian | Multiple | 25 Jun, 2019 | 2.0 MB | |
| Installation guide | Danfoss Icon™ Display 24V Room Thermostat F86 OW (Installation Guide) | Hungarian | Multiple | 25 Jun, 2019 | 2.0 MB | |
| Installation guide | Danfoss Icon™ Display 24V Room Thermostat F86 OW (Installation Guide) | Bulgarian | Multiple | 25 Jun, 2019 | 2.0 MB | |
| Installation guide | Danfoss Icon™ Display 24V Room Thermostat F86 OW (Installation Guide) | Czech | Multiple | 25 Jun, 2019 | 2.0 MB | |
| Installation guide | Danfoss Icon™ Display 24V Room Thermostat F86 OW (Installation Guide) | Latvian | Multiple | 13 May, 2019 | 2.0 MB | |
| Installation guide | Danfoss Icon™ Display 24V Room Thermostat F86 OW (Installation Guide) | Romanian, Moldavian, Moldovan | Multiple | 25 Jun, 2019 | 2.0 MB | |
| User guide | Danfoss Icon™ Programmable 230V Room Thermostat (User Guide) | Arabic; Bulgarian; Czech; Danish; German; English; Spanish, Castilian; Estonian; Persian; Finnish; French; Croatian; Hungarian; Icelandic; Italian; Korean; Lithuanian; Latvian; Norwegian Bokmål; Dutch, Flemish; Polish; Romanian, Moldavian, Moldovan; Russian; Slovak; Slovenian; Serbian; Swedish; Turkish; Ukrainian; Chinese | Multiple | 29 May, 2019 | 2.3 MB | |
| Installation guide | Danfoss Icon™ Programmable 230V Room Thermostat F80 IW 1 | Danish; German; English; Spanish, Castilian; Estonian; Finnish; French; Icelandic; Italian; Lithuanian; Latvian; Norwegian Bokmål; Dutch, Flemish; Polish; Swedish | Multiple | 27 May, 2019 | 1.1 MB | |
| Installation guide | Danfoss Icon™ Programmable 230V Room Thermostat F80 IW 2 | Arabic; Bulgarian; Czech; Persian; Croatian; Hungarian; Korean; Romanian, Moldavian, Moldovan; Russian; Slovak; Slovenian; Serbian; Turkish; Ukrainian; Chinese | Multiple | 27 May, 2019 | 1.1 MB | |
| User guide | Danfoss Icon™ Thermostat 24V (User Guide) | Estonian | Multiple | 25 Jun, 2019 | 1.3 MB | |
| User guide | Danfoss Icon™ Thermostat 24V (User Guide) | Bulgarian | Multiple | 25 Jun, 2019 | 1.3 MB | |
| User guide | Danfoss Icon™ Thermostat 24V (User Guide) | Czech | Multiple | 25 Jun, 2019 | 1.3 MB | |
| User guide | Danfoss Icon™ Thermostat 24V (User Guide) | Hungarian | Multiple | 25 Jun, 2019 | 1.3 MB | |
| User guide | Danfoss Icon™ Thermostat 24V (User Guide) | Romanian, Moldavian, Moldovan | Multiple | 25 Jun, 2019 | 1.3 MB | |
| User guide | Danfoss Icon™ Thermostat 24V (User Guide) | Slovak | Multiple | 25 Jun, 2019 | 1.3 MB | |
| User guide | Danfoss Icon™ Thermostat 24V (User Guide) | Croatian | Multiple | 25 Jun, 2019 | 1.3 MB | |
| Installation guide | Danfoss Icon™ Wireless Dial Room Thermostat (Installation Guide) | Romanian, Moldavian, Moldovan | Multiple | 08 Aug, 2019 | 512.4 KB | |
| Installation guide | Danfoss Icon™ Wireless Dial Room Thermostat (Installation Guide) | Bulgarian | Multiple | 08 Aug, 2019 | 500.7 KB | |
| Installation guide | Danfoss Icon™ Wireless Dial Room Thermostat (Installation Guide) | Czech; Danish; German; English; Estonian; Finnish; French; Hungarian; Icelandic; Italian; Lithuanian; Norwegian Bokmål; Dutch, Flemish; Polish; Russian; Slovak; Swedish; Turkish; Chinese | Multiple | 10 Sep, 2019 | 1.0 MB | |
| Installation guide | Danfoss Icon™ Wireless Dial Room Thermostat (Installation Guide) | Croatian | Multiple | 08 Aug, 2019 | 501.7 KB | |
| Manufacturer's Declaration | Danfoss Manufacturer's Statement of Compliance on EU Data Act 250902EN0301.001 | English | Multiple | 05 Nov, 2025 | 277.2 KB | |
| Fact sheet | Danfoss Zigbee repeater firmware versions | English | Multiple | 25 Mar, 2025 | 95.9 KB | |
| Brochure | Grow your business and discover the value of working with one partner (International version) | Slovak | Slovakia | 22 Mar, 2021 | 16.4 MB | |
| Brochure | Grow your business and discover the value of working with one partner (International version) | English | Multiple | 18 Nov, 2015 | 5.6 MB | |
| Catalog | Hydronic floor heating - Easy, proven and profitable | Polish | Poland | 15 Mar, 2016 | 5.7 MB | |
| Catalog | Hydronic floor heating - Easy, proven and profitable | French | France | 18 Oct, 2015 | 7.5 MB | |
| Catalog | Hydronic floor heating - Easy, proven and profitable | Turkish | Turkey | 30 Nov, 2015 | 5.4 MB | |
| Catalog | Hydronic floor heating - Easy, proven and profitable | Chinese | China | 30 Nov, 2015 | 5.9 MB | |
| Catalog | Hydronic floor heating - Easy, proven and profitable | Lithuanian | Lithuania | 03 Dec, 2015 | 5.6 MB | |
| Catalog | Hydronic floor heating - Easy, proven and profitable | German | Austria | 28 Oct, 2014 | 4.2 MB | |
| Catalog | Hydronic floor heating - Easy, proven and profitable | Czech | Czech Republic | 23 Oct, 2014 | 5.8 MB | |
| Catalog | Hydronic floor heating - Easy, proven and profitable | Russian | Central Asia Unit | 30 Nov, 2015 | 5.8 MB | |
| Brochure | Icon2_floor heating control_Everything happens faster with Icon2™ | German | Switzerland | 17 Mar, 2026 | 2.1 MB | |
| Brochure | Icon2_floor heating control_Everything happens faster with Icon2™ | French | Switzerland | 17 Mar, 2026 | 2.0 MB | |
| Brochure | Icon2_floor heating control_Everything happens faster with Icon2™ | Czech | Czech Republic | 20 Mar, 2023 | 2.5 MB | |
| Brochure | Icon2_floor heating control_Everything happens faster with Icon2™ | Norwegian Bokmål | Norway | 15 Sep, 2023 | 18.7 MB | |
| Brochure | Icon2_floor heating control_Everything happens faster with Icon2™ | Slovenian | Slovenia | 17 Jan, 2023 | 1.4 MB | |
| Brochure | Icon2_floor heating control_Everything happens faster with Icon2™ | Polish | Poland | 01 Jun, 2023 | 3.5 MB | |
| Brochure | Icon2_floor heating control_Everything happens faster with Icon2™ | Finnish | Finland | 26 Feb, 2024 | 1.9 MB | |
| Brochure | Icon2_floor heating control_Everything happens faster with Icon2™ | Ukrainian | Ukraine | 06 Sep, 2023 | 2.2 MB | |
| Brochure | Icon2_floor heating control_Everything happens faster with Icon2™ | French | Belgium | 17 Aug, 2023 | 19.5 MB | |
| Brochure | Icon2_floor heating control_Everything happens faster with Icon2™ | German | Multiple | 05 Mar, 2026 | 20.6 MB | |
| Brochure | Icon2_floor heating control_Everything happens faster with Icon2™ | Dutch, Flemish | Netherlands | 14 Mar, 2025 | 3.4 MB | |
| Brochure | Icon2_floor heating control_Everything happens faster with Icon2™ | Dutch, Flemish | Belgium | 17 Aug, 2023 | 19.5 MB | |
| Brochure | Icon2_floor heating control_Everything happens faster with Icon2™ | Slovak | Slovakia | 17 Aug, 2023 | 3.4 MB | |
| Brochure | Icon2_floor heating control_Everything happens faster with Icon2™ | Danish | Denmark | 17 Dec, 2025 | 19.5 MB | |
| Fact sheet | ZigBee Cluster Specification Danfoss Icon Zigbee Radio Module and Icon2 Main Controller | English | Multiple | 08 Sep, 2025 | 2.6 MB |
FAQ
How do I reset an Icon2™ Main Controller?
To do a factory reset on an Icon2™ Main Controller, please follow these steps:
- Press and hold '>' and 'OK' but- tons for more than 5 seconds.
- The LEDs above the buttons will turn on one after the other.
- When both LEDs are blinking BLUE, release both buttons, and the Main Controller will be reset, and all LEDs will light up with a RED light.
– It is possible to abort the reset by pressing the buttons for more than 10 seconds, where after the LEDs will turn off, the buttons can be safely released without resetting the Main Controller. - Once reset, the Main Controller will re-initialize, and the output LEDs will move back and forward in a run pattern.
How do I reset an Icon2™ thermostat or Sensor?
To do a factory reset on an Icon2™ RT or Sensor please follow these steps:
Resetting Icon2 RT and Featured RT :
1. Press and hold “Arrow Up and Down” for 5 seconds.
2. The display will show “DEL ALL”
3. Press the “Tickmark” to confirm the reset.
4. Once reset the display will show “- - -” and is ready for reinstallation.
rtaImage.jpg
Resetting Icon2 Sensor:
1. Press and hold the areas as shown in the illustration below for 5 seconds.
2. All icons will be flashing.
3. Press the “Tickmark” to confirm the reset.
4. Once reset the “Tickmark” will blink and the sensor is ready for reinstallation.
rtaImage2.jpg
How does Dual heating work?
Dual heating is used when utilizing different heat emitters in the same room by a single room thermostat, typically this will be a floor heating system combined with radiator heating.
This require that min. 2 outputs is assigned to the thermostat and that the thermostat is equipped with a floor sensor.
Heat emitter types are chosen in the Icon2™ app where settings are made as follows:
Floor heating circuit will be set for Slow or medium.
Radiators will be set for Fast.
When using Dual heat mode the regulation will be based on the following principle.
The floor sensor is used to maintain a min. floor temperature as set in ME.5 on the thermostat or in the Icon2™ App.
Room temperature is maintained by the ambient sensor in the thermostat which will activate the radiator outputs.
My thermostat is gone or broken, how do I replace it?
If one of the thermostats should go missing or brake the system will
show an alarm on the main Control- ler and if the system is connected to an Ally App an alarm will also be shown here,
If the the thermostat is gone or broken it is not possible to uninstall it by resetting the thermostat and in this case you will need to remove it from the system using the Icon2™ commissioning App.
This is done by connecting to the Icon2™ Main Controller following these steps:
1. Open the Icon2™ commissioning App and select “connect to existing system”
2. Click the tile with system infor- mation in the top of the screen, this will take you to the Main Controller configuration screen.
3. Click next in the lower right cor- ner of the configuration screen.
4. Select the output connected to the room where the missing or broken thermostat was assigned.
5. Press the 3 dots next to the room thermostat in the upper right corner screen and press “Remove thermostat”.
6. Confirm that you want to remove the thermostat when prompted to do so.
Once the thermostat is out of the system the outputs will become available for a new thermostat to be assigned.
What does a dew point sensor do?
In warm and humid areas there is a risk of condensation occurring when chilled water is circulated through the pipes of the floor heating / cooling installation.
To avoid damaging the construction it is always recommended to install a dew point sensor on the supply side of the installation to avoid condensation and moisture in the floors. The dew point sensor will measure the relative humidity on the surface of the pipe and if this goes above 90% the sensor will trigger a signal to the Icon2™ Main Controller that will shut off the circulation pump and close the actuators to protect the installation. Once the relative humidity goes below 90% the circulation pump and actuators will be activated again.
What does the output settings mean for heating and cooling?
The Icon2™ system has several configuration options for the actuator outputs depending on which application is running.
It is possible to have different configurations for multiple outputs connected to the same room thermostat.
The default application is heating and this application the only configuration option for the output will be:
Heat Emitter type:
- Slow, this is a traditional floor heating system where the pipes are cast into concrete or screed. This is a slow acting system due to the inertia of the concrete or screed mass that will make the system act slowly.
- Medium, this is a “light” floor heating system where pipes are installed directly beneath the floor surface in panels, and due to the low inertia of the solution this is a faster solution than traditional floor heating.
- Fast, this setting is used when the output is controlling a radiator, as there is close to no inertia in a radiator the heat will be transferred to the room very fast. If the system is running a heating and cooling application there will be additional configuration options available for outputs:
Heating/ cooling:
- Heating and Cooling, this setting will activate the output both during heating and cooling.
- Heating only, this setting will only activate the output when the system is in heating mode. This setting is often used in bathrooms where people usually prefer not to have cold floor or if the output is set to Fast and connected to a radiator to avoid condensation.
- Cooling only, this setting will only activate the output when the system is in cooling mode. This setting is often used when for example having a chilled beam ceiling connected to the outputs.
How do I share and save an Icon2™ handover report
An Icon2™ handover report can be shared via email, SMS or through other communication app's installed on your smart phone. Furthermore the handover report is saved on the Main Controller and can be saved in the Danfoss Profile storage. Please note Danfoss Profile storage require a Danfoss account which is free to setup and use.
Is is possible to mounting the Icon2™ Main Controller on a DIN rail?
Yes, the Icon2™ Main Controller can be mounted either using screws or DIN rail mounting.
Please note that the Main Controller does not come with a DIN rail in the box but does include 2 screws and walls plugs for mounting.
How does the strain relief work on the Icon2™ Main Controller?
The strain relief for relays and mains power works by pushing the cable through the opening underneath the relay you want to use. Mounting the cable and tightening the screw on the strain relief to secure the cable from falling out accidentally. Please always remember to use the strain relief for safety reasons.
Can I mix different actuator types on Icon2™?
It is possible to use different types of actuators with the Icon2™ Main Controller speaking from a functional point of NC (Normally Closed) or NO (Normally Open).
Please note: It is not possible to mix actuators types with different cable thickness due to the strain relief on the Icon2™ Main Controller.
When should I use a screw to mount my wireless Icon2™ RT?
It is recommended to use a screw to fasten the magnet on a wall when the surface is either very smooth like a ceramic tile or if the surface has a very rough texture. The RT's and Sensor is supplied with a suitable screw and wall plug.
How many wired thermostats can I connect?
It is possible to connect up to 15 thermostats to the Icon2™ Main Controller. The Icon2™ Main Controller has 3 connectors for wired thermostats. Thermostats can be installed in serial or in star configuration.
What is the difference between a Basic and Advanced Main Controller?
The difference between Basic and Advanced versions of the Icon2™ Main Controller is the number and complexity of the applications available.
Basic version offer applications 00 + 04
Advanced version offer applications 00 to 20
Note that application 00 is the standard floor heating application.
How do I mount an external antenna and why?
An external antenna can be mounted on the Icon2™ Main Controller using the SMA connectors in the right side of the device. Please note that there are two separate connectors that an antenna can be mounted on.
The upper antenna is used for the internal network between Icon2™ RT's and Sensor.
The lower antenna is used for the external network for the Ally™ Gateway or 3rd party Zigbee gateway.
These networks do not communicate, so in some cases it can be required to mount an external antenna on both networks.
An external antenna can be required in some situations where the Main Controller is placed behind a layer of metal e.g. cabinet or inside a flat station, the antenna should be placed in such a way that the wireless signal can reach the antenna without obstacles in the way.
How does external cooling changeover work?
By adding an external signal to Input 2 on the Icon2™ Main Controller it is possible to switch between heating and cooling from an external source e.g. from a heat pump or an external switch.
When a signal for cooling is triggered, the system will switch to cooling mode immediately without delay, however please note that the measured room temperature must be more than 2°C above setpoint before the outputs will be activated.
Why should I perform a network test?
It is always recommended to perform a network test to ensure the stability of the wireless communication before installing the thermostat on the wall. This can be done by running a network test from the Icon2™ App or on individual room thermostats from ME.3 on the RT's (Hold ↩ button untill ME.1 shows, then navigate to ME.3)
When a network test is run from the App you will see a Green, Yellow or Red symbol which will indicate if the signal is strong or not.

If the network test (Link test) is performed from the RT a value in percentage will be returned. In this case anything above 12% should be seen as the RT having a strong enough connection to the Main Controller.
Please note that Icon2™ Sensors does not have this option, the network test should then be done using the Icon2™ App.
In case it is not possible to connect with a strong enough signal to a sub-device (RT or Secondary MC) you should consider using a repeater to extend or re-route the wireless signal.
When you add a repeater to an existing installation, it is good to restart the devices which should benefit from the repeater, once the repeater is adopted by the main controller.
Can more than one actuator output be assigned to a thermostat?
Yes, up to 15 outputs can be assigned to a single thermostat. This can be done either via the Icon2™ App by selecting all of the outputs you want to assign to a certain thermostat before clicking the 'Connect to thermostat' button.
It is also possible to assign multiple outputs to a single thermostat using the mechanical installation mode.
This is done by pressing and holding '>' for 3 seconds until the LED above '>' starts blinking green. Outputs are chosen by clicking '>' until the LED on the output you want to assign starts blinking.
The output is selected using the 'OK' button. Once selected, the output LED will be dimmed. Repeat this process for all of the outputs you want to assign to the same thermostat. After all outputs have been selected press the upper left corner of the RT or Sensor you want to assign the outputs to. The RT or Sensor will show 'Tickmark' when the thermostat has been assigned.
How does my system work when in cooling mode?
When the Icon2™ system is in cooling mode the thermostat will start cool when the room setpoint is exceeded by 2°C degrees.
The thermostat will be active for cooling as long as the room
temperature is 2°C higher than the setpoint.
Please note that if you are running with setback periods the cooling will be disabled when the system is in setback mode.
If you have a floor sensor mounted on the thermostat, floor setpoints will be disabled while the system is in cooling mode.
What does Idle mode mean?
Idle mode is used when the system is between heating and cooling.
The Idle mode will ensure that valves on both heating and cooling side of the system will be closed while the change over is ongoing to avoid mixing the water from the warm side into the cold side, and cold into the warm side.
Why is On/Off regulation disabled in some applications?
Some features such as Auto balancing and flow temperature control rely on the PWM+ heating regulation algorithm to function, this is why some application will disable the possibility to use On/Off regulation.
How does the floor sensor work?
The floor sensor can be configured to work in different ways:
Comfort: This mode will have the floor sensor working within a given range of a min. and max. surface temperature.
Floor only: This mode will disable the ambient room temperature sensor and only regulate the temperature based on the floor sensor measurements.
Dual: This mode will use the min. floor temperature setpoint to maintain a comfort level temperature on the floor surface.
How does flow temperature control work?
The flow temperature control work by continuously monitoring the heat demand in the system and comparing this to the reaction time of the rooms. If the reaction time for the room with the highest heat demand is too slow the system will calculate and adjust the flow temperature to compensate.
This is a continuous operation that will be running in real time to ensure the optimal flow temperature in all situations no matter if the temperature needs to be adjusted up or down.
How many actuators can I connect per output?
Each of the outputs can fit 1 actuator with a wire diameter of up to 1,5 mm2.
EU Data Act – Data Access Requests
If you wish to request access to usage data in accordance with the EU Data Act (Regulation (EU) 2023/2854), you can contact Danfoss via our official contact page.
Under the EU Data Act, you may have the right to:
- Request access to data generated by the use of our products or services.
- Obtain such data in a structured, commonly used, and machine readable format.
- Share your data with third parties of your choice, where applicable.
Danfoss will process such requests in line with applicable legal requirements, ensuring data security and confidentiality.
Product recall of Icon2™ Main Controller produced between week 24 and 36 2025
Danfoss has issued a product recall of Icon2™ Main Controllers produced between week 24 and 36 2025.
The products have been produced with a software bug, which prohibits them from performing a firmware update to a higher version than 1.60 with success.
Majority of products have already been reworked, where the cause of the problem is solved.
If a main controller which was not yet reworked is updated, it would end up in an endless restarting cycle. An update could be performed using Icon2™ App or when connected to Ally™ Gateway.
The Icon2™ App can be used to identify if the main controller is recalled, by connecting to the product directly. If it is recalled, the following message will be shown:

I experience interference problems in my home
Icon2™ is communicating wirelessly using 2,4 Ghz radio signals with room thermostats, repeaters, secondary main controllers and gateway.
The radio frequency spectrum could also be used by other devices in the home like WiFi access points and smart home devices, even networks from naboring homes could in theory also have a negative impact on the signals.
For this reason the Icon2™ main controller has a built-in feature, which will make a radio signal check during the first minutes it is turned on, after having being powered on for the first time or after it has just been factory reset.
During these 10 minutes, the Primary MC will scan the 2,4 Ghz bandwidth accross 6 possible channels and try to identify which of them is the least congested.
Important: Should the Primary MC be asked to search for sub-devices like room thermostats, repeaters or secondary main controllers during this 10 minutes period, it will stop the 2,4 Ghz scan and select the best known channel at that moment.
If you experience interference issues in your home, we therefore recommend you to ensure that all other radio devices are active, and then factory reset the main controller to allow it to find the most optimal channel.
Product Security and Telecommunications Infrastructure (PSTI)
What is the minimum support period?
The minimum support period: Invoice date + 2 years.
How to report security concern or security vulnerability?
Report security concerns or security vulnerability if you have discovered an issue with one of our products or services.
Videos
Support videos for smart home compatibility
Learning

Visit our Learning Center
Danfoss offers online training materials for technicians and designers working with hydronic heating. All e-lessons are available free and on-demand through Danfoss Learning portal. For more information, register in our support section by following the link or find the overview of available relevant trainings in the table below.
Register here
Drawings

BIM library for MEP designs
Get your 3D BIM models and start designing your hydronic underfloor heating.
Find the needed product and download the BIM models from the “Visuals” tab.
Go to Product store
We offer expert hydronic HVAC design and consultancy services at Danfoss' Design Support Center.
Read more