Danfoss Icon™ support

  • Pārskats
  • Videos
  • Dokumenti
  • FAQ
  • Installation
  • Drawings
Danfoss Icon™ - designed to make people’s life easier

Danfoss Icon™ - designed to make people’s life easier

Advanced room controls for hydronic floor heating and other applications with actuators. Designed like a light switch to complement the interior.

Modular concept to cover every application:
Wireless, 24V and 230V
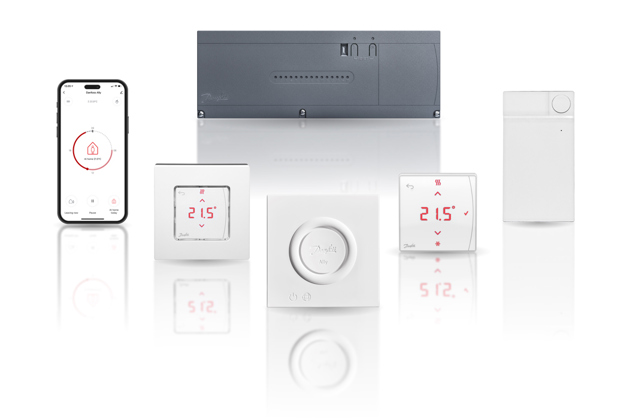
  Wireless 24V 230V
 
Thermostat models Display + Display infrared + Dial Display Programmable + Display + Dial
Thermostat versions On-wall On-wall + in-wall On-wall + in-wall
Exchangeable frames In-wall In-wall
Icon App
Cooling options Automatic + Manual Automatic + Manual Manual
Automatic balancing
Supply temp. control
Commissioning test
Communication Wireless 2-way Star / daisy chain bus Wired 230V
Zones Up to 3x 15 = 45 Up to 3x 15 = 45 Up to 1x 8 = 8


Videos

Dokumenti

Dokumenti
Tips Nosaukums Valoda Valid for Atjaunots Lejupielādēt Faila veids
Pielietojuma rokasgrāmata Designing hydronic floor heating - Get the optimum results Somu Somija 06 okt., 2015 5.1 MB .pdf
Pielietojuma rokasgrāmata Designing hydronic floor heating - Get the optimum results Poļu Polija 06 okt., 2015 5.1 MB .pdf
Pielietojuma rokasgrāmata Designing hydronic floor heating - Get the optimum results Ķīniešu (CN) Ķīna 04 dec., 2015 5.2 MB .pdf
Pielietojuma rokasgrāmata Designing hydronic floor heating - Get the optimum results Dāņu Dānija 19 sept., 2019 2.8 MB .pdf
Pielietojuma rokasgrāmata Designing hydronic floor heating - Get the optimum results Turku Turcija 04 dec., 2015 3.6 MB .pdf
Pielietojuma rokasgrāmata Designing hydronic floor heating - Get the optimum results Lietuviešu Lietuva 04 dec., 2015 5.0 MB .pdf
Pielietojuma rokasgrāmata Designing hydronic floor heating - Get the optimum results Krievu Central Asia Unit 04 dec., 2015 5.2 MB .pdf
Pielietojuma rokasgrāmata Designing hydronic floor heating - Get the optimum results Vācu Multiple 19 maijs, 2017 2.7 MB .pdf
Pielietojuma rokasgrāmata Designing hydronic floor heating (Application Guide) Angļu Multiple 06 jūl., 2021 8.1 MB .pdf
Pielietojuma rokasgrāmata Designing hydronic floor heating (Application Guide) Čehu Čehu Republika 06 marts, 2023 3.4 MB .pdf
Brošūra Grow your business and discover the value of working with one partner (International version) Angļu Multiple 19 nov., 2015 5.6 MB .pdf
Brošūra Grow your business and discover the value of working with one partner (International version) Slovāku Slovākija 23 marts, 2021 16.4 MB .pdf
Katalogs Hydronic floor heating - Easy, proven and profitable Turku Turcija 01 dec., 2015 5.4 MB .pdf
Katalogs Hydronic floor heating - Easy, proven and profitable Lietuviešu Lietuva 04 dec., 2015 5.6 MB .pdf
Katalogs Hydronic floor heating - Easy, proven and profitable Krievu Central Asia Unit 01 dec., 2015 5.8 MB .pdf
Katalogs Hydronic floor heating - Easy, proven and profitable Zviedru Zviedrija 10 marts, 2015 5.8 MB .pdf
Katalogs Hydronic floor heating - Easy, proven and profitable Ķīniešu (CN) Ķīna 01 dec., 2015 5.9 MB .pdf
Katalogs Hydronic floor heating - Easy, proven and profitable Poļu Polija 16 marts, 2016 5.7 MB .pdf
Katalogs Hydronic floor heating - Easy, proven and profitable Čehu Čehu Republika 24 okt., 2014 5.8 MB .pdf
Katalogs Hydronic floor heating - Easy, proven and profitable Franču Francija 19 okt., 2015 7.5 MB .pdf
Katalogs Hydronic floor heating - Easy, proven and profitable Vācu Austrija 29 okt., 2014 4.2 MB .pdf
Brošūra Hydronic floor heating - end-user brochure Angļu Multiple 12 jūl., 2017 10.8 MB .pdf
Katalogs Hydronic floor heating - Product guide Dāņu Dānija 14 aug., 2017 5.0 MB .pdf
Brošūra Why choose floor heating? Comfort, a lower heating bill and much more... Lietuviešu Lietuva 04 dec., 2015 1.6 MB .pdf
Brošūra Why choose floor heating? Comfort, a lower heating bill and much more... Turku Turcija 01 dec., 2015 1.6 MB .pdf
Brošūra Why choose floor heating? Comfort, a lower heating bill and much more... Ķīniešu (CN) Ķīna 01 dec., 2015 1.8 MB .pdf
Brošūra Why choose floor heating? Comfort, a lower heating bill and much more... Dāņu Dānija 06 nov., 2019 1.4 MB .pdf
Brošūra Why choose floor heating? Comfort, a lower heating bill and much more... Poļu Polija 10 dec., 2014 2.0 MB .pdf
Brošūra Why choose floor heating? Comfort, a lower heating bill and much more... Somu Somija 13 okt., 2014 1.9 MB .pdf

FAQ

To control an Icon system with the Icon App you need:

A 24V Icon Master Controller.
Note that Icon 230V room thermostats cannot be controlled with the Icon App. You are however able to schedule the Icon 230V Programmable Room Thermostats individually.

Yes.

Simply follow the first 4 steps below. Once the Icon App Module 088U1101 is installed, the user can scan the QR code on the Icon App Module to download the Icon App (step 5 & 6 below) or search for “Danfoss Icon” in the App Store or Google Play.

Scan the below QR code or search for “Danfoss Icon” in the App Store or Google Play.

Open the App and press [Start setup]
Press the button on the Danfoss Icon App Module, when you are ready to set up the system. Remember to enable Bluetooth
Note: The App will prompt you to enable Bluetooth, if not already enabled on your phone. The green LED on the Danfoss Icon App Module will blink slowly, when not yet connected. When attempting to connect to the phone, the LED will blink rapidly. When connection is established, the LED will be permanently lid for 2 minutes, after which it turns off.

Name your house
Choose Network
Enter Wi-Fi code for the wireless network.
Note: This step is not needed, if the phone used is already connected to the chosen network

Enter user name
The system will save the data and confirm that the setup is completed

Walk to the room you want to rename, and set a unique temperature setpoint (e.g. 28 degrees) on the thermostat locally, so that you can later identify the room on the App list
On the main screen on the App, swipe left to access the room list
Find the room with the unique setpoint (e.g. 28 degrees), and click to enter room menu.
Choose the pencil icon in the upper right corner, and type a new name.

Repeat for all rooms.

The Danfoss Icon App is operating with a schedule where you can choose to be “At Home” or “Away”.

To change schedule, please go through the following steps:

Click on the centre of the main screen of the App
Note: The rooms are divided into two groups: “Living Zone” and “Individual Rooms”. “Living Zone” is a list of rooms sharing the same heating schedule for when you are “At Home and “Away”. By choosing the pencil icon in the upper right corner you can drag and drop each individual room from the “Living Zone” to the “Individual Rooms” group or vice versa.


Click on the list of rooms in the “Living Zone” or click on one of the individual rooms under “Individual Rooms”  
Click on the day you want to view.
Note: The day schedule can be copied to other days by pressing [Copy]

Move the red dots to change the “At Home” period and confirm. Periods not marked with red are “Away” periods.
Changing the temperature for “At Home” and “Away” is explained in a separate FAQ.

The desired temperatures for “At Home” and “Away” can be set individually for each room.

Access the right-side panel on the main screen by pressing the temperature symbol in the upper right corner or swipe left.  
You now have two options. Click on a room name to view or change “At Home” and “Away” temperatures for the room in question or click on the pencil symbol. When clicking the pencil symbol, the temperature for the current mode (“Away” or “At Home”) can be changed.
You can also change the temperature by pressing each individual room thermostat. When the thermostat is awoken and temperature adjustment is attempted, the room thermostat will show the present setpoint. Any change of setpoint will overwrite the setpoint for the mode (“Away” or “At Home”) active at the time of the change.

The Icon App allows you to share access to the system:

Press the three lines in the upper left corner of the main screen
Choose [Settings]
Press [Share house] to open a page that will show you a code
The code will for security reason only be valid for two minutes
The person receiving the code should press [Receive house] in the App and type in the code from the sender within two minutes
Note: When sharing a “House” you also transfer full rights to install or delete thermostats. You can, however, choose whether you want to also transfer rights to add or delete other users.

The vacation mode overrules the schedules for “At Home” and “Away”. It reduces the temperature for a longer period for all room thermostats.  The temperature for the vacation mode can be set in the following way:

Press the three lines in the upper left corner of the main screen
Choose [Settings]
Press [Vacation temperature]

If Wi-Fi is lost, the thermostats will continue to regulate the room temperatures, but you will not be able to establish connection using your phone.

If Wi-Fi connection is lost, an alarm will appear in the App. You can choose to get the alarm as a push notification on your phone:

Press the three lines in the upper left corner of the main screen
Choose [Settings]
Press [Notifications]

Some Samsung phones have a “Smart Network switch”. This Smart Network needs to be switched off for the phone to connect. Go to [Settings] > [Wi-Fi] on your phone and disconnect the “Smart Network switch” and try to reconnect.

Parameter Value Comments
SSID Any unique name  
Hidden Disable  
Frequency (*) 2.4 GHz Only 2.4 GHz is supported
2.4 GHZ mode (*) 802.11b/g/n Do not use N only mode
Security (*) WPA2 Personal (AES) Do not use mixed mode WPA/WPA2.
WPA2 offers the strongest form of security.
Channel (*) Fixed (channel 1,6.or 11) Use one of the channels (1,6 or 11) with least interference.
2.4 GHz channel width (*) 20 MHz Do not use 40 MHz
MAC address authentication or filtering Disable  
DHPC Enable Only one DHCP server per network
Ports used 80 and 443  

The App is available for iOS 9.x and forward. The Android version is available for Android 5.x and forward

Try the following:

In case connection is lost, a “lost connection” notification will show on your smartphone. Check if that is the case and follow the device message to reconnect to the network.
Restart Wi-Fi Router and/or Access point
Check the router parameters (see separate FAQ)
Try to connect to a mobile hotspot to establish if the problem is associated with your router
Factory reset Danfoss IconTM App Module. This is done by disconnecting the network cable from the App Module. Then hold the bottom on the App Module while reconnecting the network cable. Let go of the bottom after 10 seconds. If reset is successful, the LED will turn red for a few seconds. Note: All settings will be deleted
Turn off other devices that use 2.4 GHz as they could be interrupting the signal
Check the parental controls on your Wi-Fi router/access point and other firewall settings (Refer to your Wi-Fi router documentation to see if this feature is enabled on your network and how you can exempt Danfoss IconTM system from these restrictions).
Update your Wi-Fi access point or router’s firmware

Please try to search for the Wi-Fi network one more time.

If that does not work you may have a hidden network and in that case please consult the manual of your Wi-Fi router to find out if your Wi-Fi network is hidden (SSID Broadcast disabled) and how to make your Wi-Fi network visible (SSID Broadcast enabled).

Please also check the recommended router setting in the separate FAQ

When you buy a new smartphone or router, you will have to re-establish the connection. See separate FAQ on how to install and set up the App. All settings are stored via the cloud solution. The App Module does not need to be reset.

Yes. Simply add a new location in the following way: 1. Press the three lines in the upper left corner of the main screen 2. Choose [Settings] 3. Press [Add new system]

Installation

Easy installation

Easy installation

It is super easy to get complete control of the underfloor heating system! Only electrical components need to be replaced and the installation is quick and easy for a professional installer. The video here shows how.

Drawings

BIM library for MEP designs

BIM library for MEP designs

Get your 3D BIM objects and start design your hydronic underfloor heating.