Below is a list of the most frequent technical support calls received by the Danfoss service department, followed by common solutions for each. Before placing a technical support call, please review this document to see if a solution is listed for the problem you are experiencing. If the problem still exists after the steps listed have been taken, please call Danfoss technical support for further assistance. Frequency drives operate on dangerous voltage levels and only qualified personnel should attempt to service them.
It is strongly advised to have a Danfoss VLT® FC Series instruction manual, programming guide and service manual available for reference during troubleshooting. Parameter numbers in this document are referenced by a P followed by the main menu parameter number, e.g., P 1-22 refers to parameter 122 “motor voltage”.
1. Motor will not run in “Drive” or “Bypass” mode
A Danfoss drive mounted in a bypass panel is controlled slightly different than a stand-alone drive. The wiring for the digital start, stop and safety commands is landed on the bypass control board. The analog speed reference signal must be applied directly to the VFDs’ control card. The motor can be started and stopped in either “Drive” or “Bypass” mode with the same set of contacts. The information below outlines the conditions that must be satisfied in order to get the motor to operate.
Verify that the mechanical switch on the bypass panel is in either the “Drive” or “Bypass” position, depending on what mode you want to run in.
- Locate connector X55 on the bypass control board.
- A connection must be made between terminals 5 & 6. These terminals are used for the safety circuit. Opening this connection will disable the drive, causing the output voltage to drop to zero immediately. You will need to wire in a normally closed safety contact between the two terminals. You can place a jumper wire between the two terminals if you are willing to disable the safety interlock function.
- A connection must be made between terminals 1 & 2. These terminals are used for damper control. The motor will not run until there is a connection between these terminals. You will need to wire a contact between the two terminals that will close when the damper is open. An alternative is to place a jumper wire between the two terminals, which will allow the drive to run when a start command has been given, but will disable the damper control function.
- A connection between terminals 3 & 4 must be made. These terminals are used for the start/stop command. The motor will now start when a connection is made. Wire in a set of N.O. contacts to allow remote starting and stopping of the motor. If a jumper wire is placed between the two terminals, the panel will always have a run command. Refer to the solution # 3 if assistance is required in setting up the speed reference command.

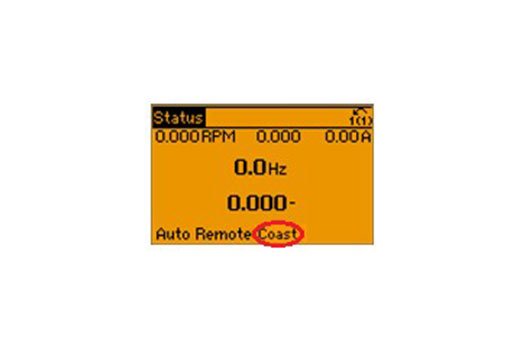
2. Alarm 60 (External Interlock) or “Coast” appears in the display and the motor will not run
This alarm appears if there is a digital input terminal programmed for the function “External Interlock” and there is not 24 Volts connected to it. A digital input terminal programmed as “External Interlock” is intended to be used as a safety terminal. When the voltage is lost or removed from the terminal, the VFD will immediately drop the output voltage to zero and the motor will coast to a stop. Follow the steps below to troubleshoot this alarm on a standalone VFD. If the following steps do not solve the problem, please call tech support for further assistance. If the drive has an integrated bypass panel, skip to the last two steps below.
- Locate the digital input terminal (P5-10 – P 5-15) that is programmed as “External Interlock” and program it to “No Operation”. The reset key will then clear the alarm.
- Place a jumper wire between control card terminal 12 (24 VDC) and the digital input programmed as “External Interlock”. Press the reset key to clear the alarm.
- If control wiring is connected to the terminal programmed as “External Interlock”, investigate why there is not 24 volts on the terminal. Look for an open in the safety circuit between the 24 volt supply and the terminal.
- Locate the digital input terminal (P5-10 – P 5-15) that is programmed as “External Interlock” and program it to “No Operation”. The reset key will then clear the alarm.
- Place a jumper wire between control card terminal 12 (24 VDC) and the digital input programmed as “External Interlock”. Press the reset key to clear the alarm.
Integrated bypass panel: The same procedures apply to a drive that reads “Auto Remote Coast” in the bottom line of the display. The only difference is that the digital input terminal is programmed to “Coast Inverse” rather than “External Interlock”
- Check for continuity between terminals 5 & 6 on connector X55 of the bypass board. There must be a connection before you can reset the alarm. Either use a jumper or wire in a normally closed safety contact between the terminals.
- Check to see if the motor overload is tripped. An alarm 60 is generated when the normally closed auxiliary contacts (95 & 96) of the overload open.